
Mail Aliases
Overview
Section titled “Overview”Use the Mail Aliases area while administering a customer account in MSPControl.
Mail: Aliases
Section titled “Mail: Aliases”The Mail > Mail Aliases page lets you create simple alias addresses that forward mail to another mailbox. This is designed for classic hosted mail providers (for example, SmarterMail) where aliases and forwarders are managed at the mail server level. Aliases are commonly used for role-based addresses (for example, sales@, billing@, info@) or short/alternative addresses that deliver to a real mailbox.
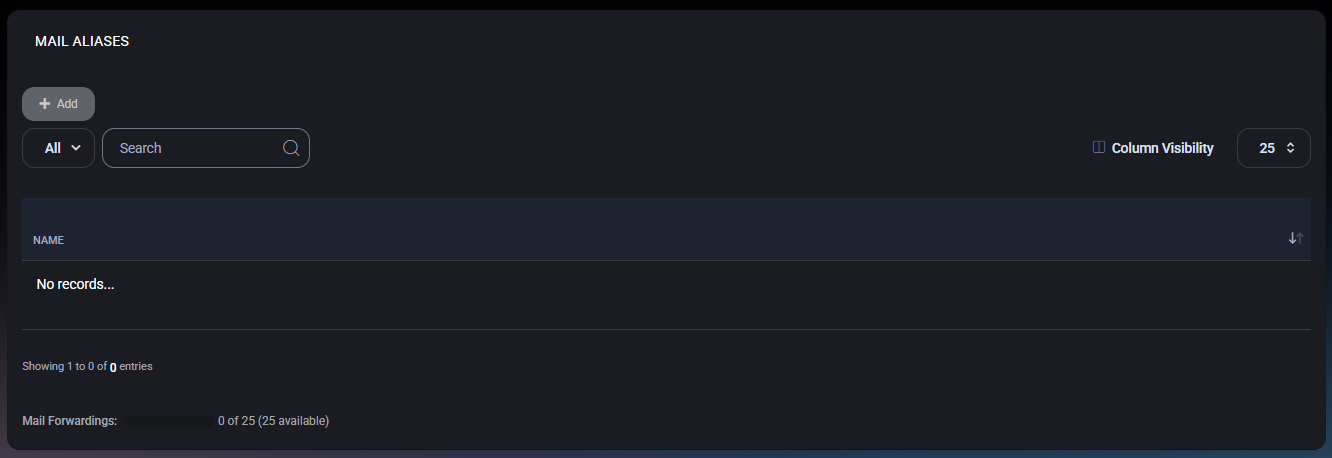
Table of Contents
Section titled “Table of Contents”Overview
Section titled “Overview”A mail alias is an additional email address that forwards messages to a target mailbox (or another deliverable address). Unlike a mailbox account, an alias usually does not have its own login credentials or storage. It simply routes incoming mail to another destination. Use aliases to keep addresses stable even when people change roles, or to provide easy-to-remember addresses for public contact points.
Aliases List Page
Section titled “Aliases List Page”The list page displays all configured mail aliases and provides standard table navigation tools.
Toolbar
Section titled “Toolbar”- Add – Opens the alias creation form.
- View Filter (for example, All) – Switches between available views if configured.
- Search – Filters aliases by name/address.
- Column Visibility – Shows or hides columns (useful if additional columns are enabled in your environment).
- Page Size (for example, 25) – Controls how many aliases are shown per page.
Displayed Columns
Section titled “Displayed Columns”- Name – The alias email address (or alias identifier) shown in the list.
Empty State
Section titled “Empty State”If no aliases exist, the table shows an empty state (for example, No records…). Use Add to create your first alias.
Capacity Indicator
Section titled “Capacity Indicator”The footer displays the current usage of alias/forwarding capacity (for example, 0 of 25, with 25 available). This helps you validate whether you can add additional aliases without exceeding plan or license limits.
Create a Mail Alias
Section titled “Create a Mail Alias”Click Add to open Mail Alias Properties. Creating an alias typically involves:
- defining the alias address (the address users will send to), and
- defining the destination address (where messages should be forwarded).
Mail Alias Properties
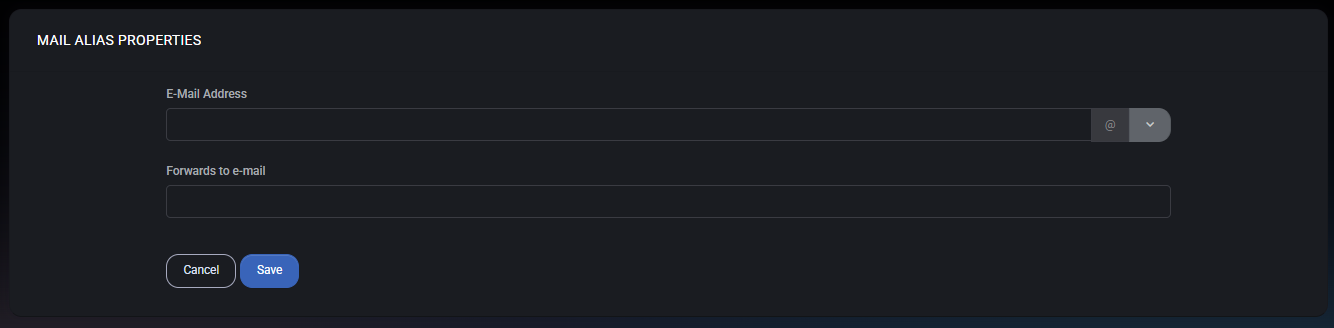
Section titled “Mail Alias Properties”The Mail Alias Properties form defines how mail routing works for the alias.
Fields
Section titled “Fields”- E-Mail Address – The alias address to create. Use the domain selector to ensure it is created under the correct hosted domain.
- Forwards to e-mail – The destination mailbox or email address that will receive messages sent to the alias.
Actions
Section titled “Actions”- Save – Creates or updates the alias.
- Cancel – Closes the form without saving changes.
Best Practices
Section titled “Best Practices”- Use role-based aliases (for example, billing@, support@) so the address remains stable even if staff changes.
- Point public aliases to shared mailboxes or controlled distribution addresses to avoid single-person dependency.
- Keep naming consistent (avoid multiple aliases for the same purpose unless you have a clear routing policy).
- Review alias capacity regularly to ensure the organization does not hit plan limits unexpectedly.