Create a User
Create user
Section titled “Create user”For the approval-to-handoff sequence, use the Microsoft 365 user onboarding checklist. Check the actual creation path, task results and service access before calling the onboarding complete.
The Create User window is used to create a new user inside the Hosted Organization. It contains multiple expandable sections (for example, General, Device Profile, Address, Company Information, and more). Use the expand/collapse chevrons on the right side of each section header to show or hide blocks while you work.
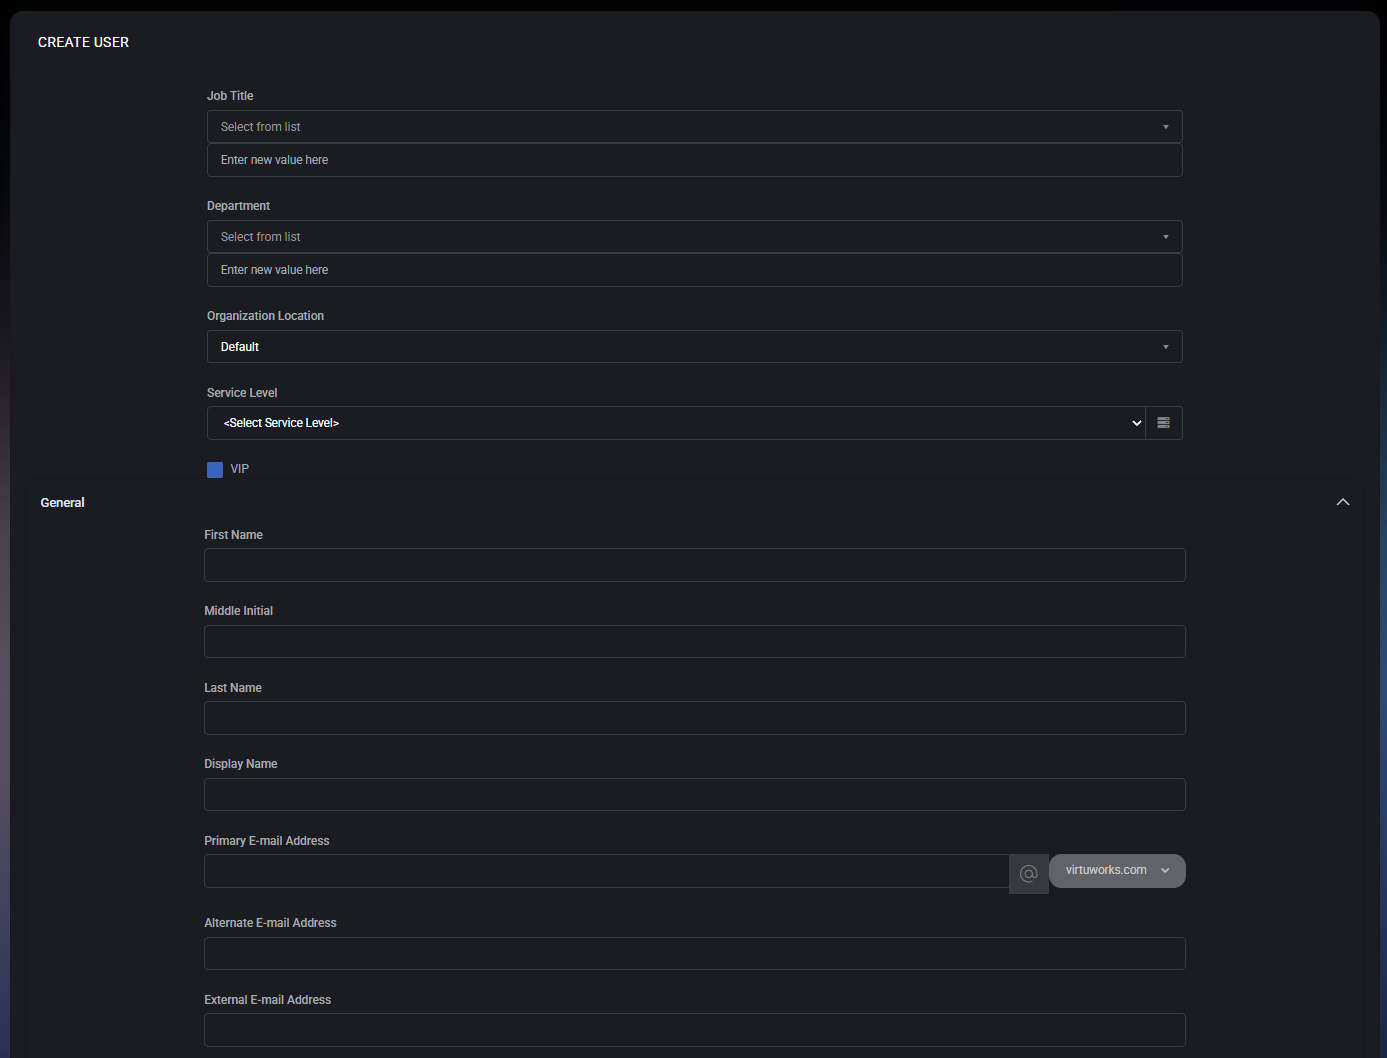
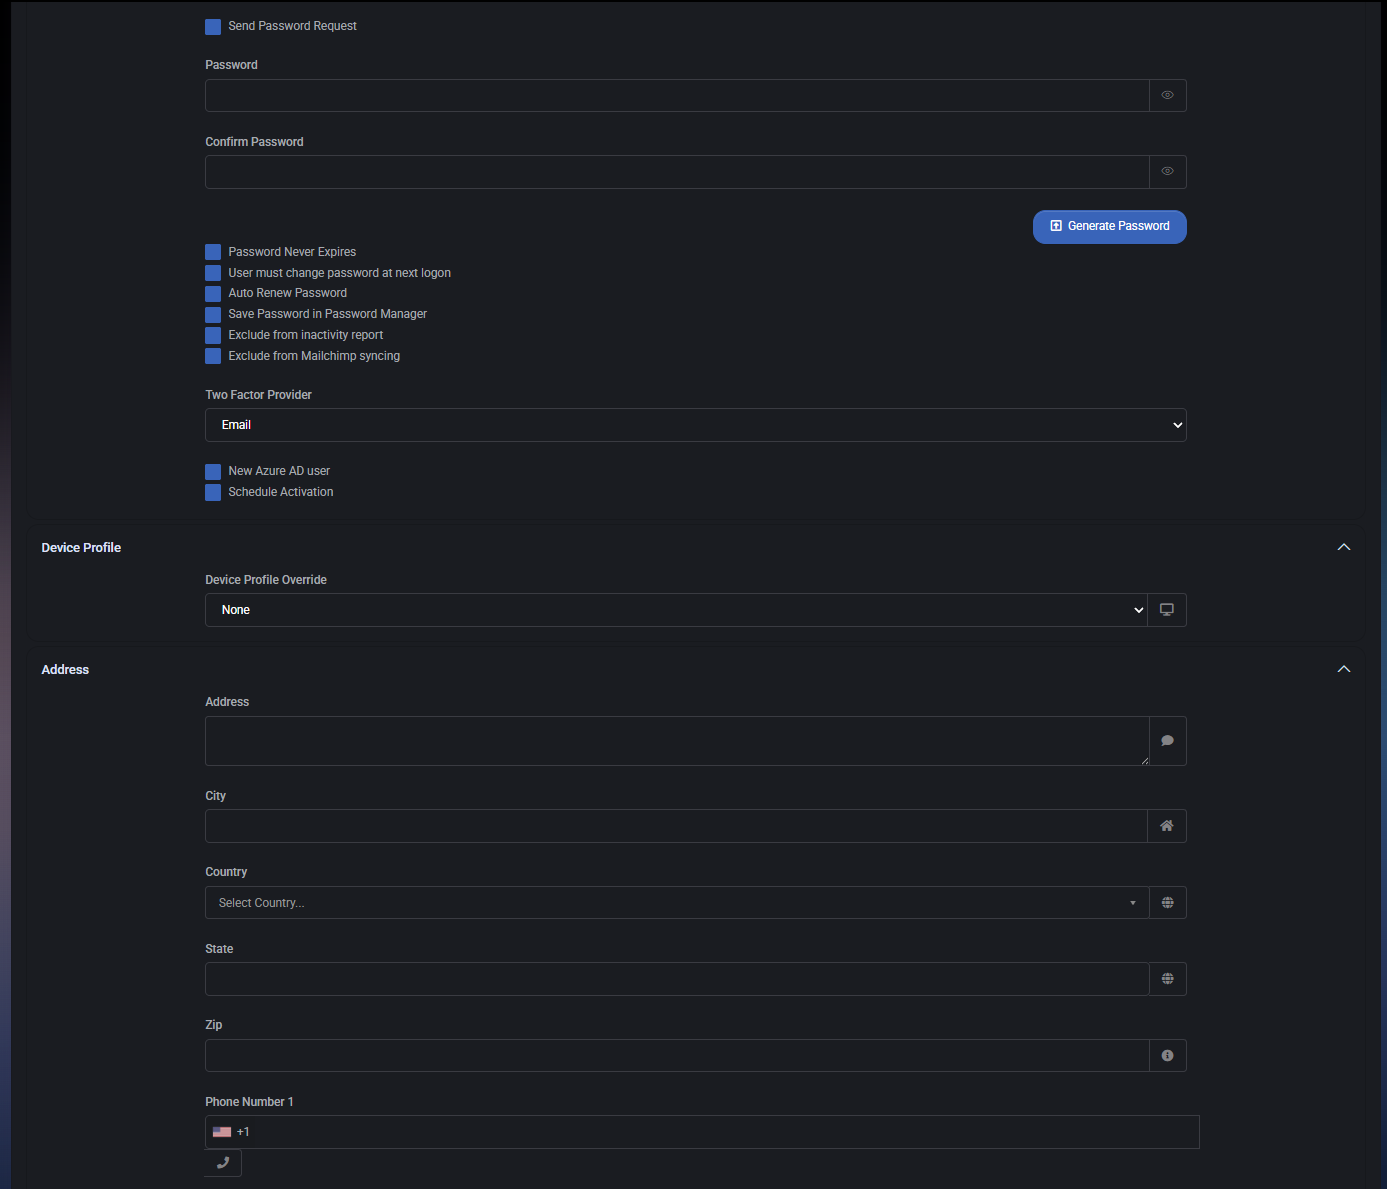
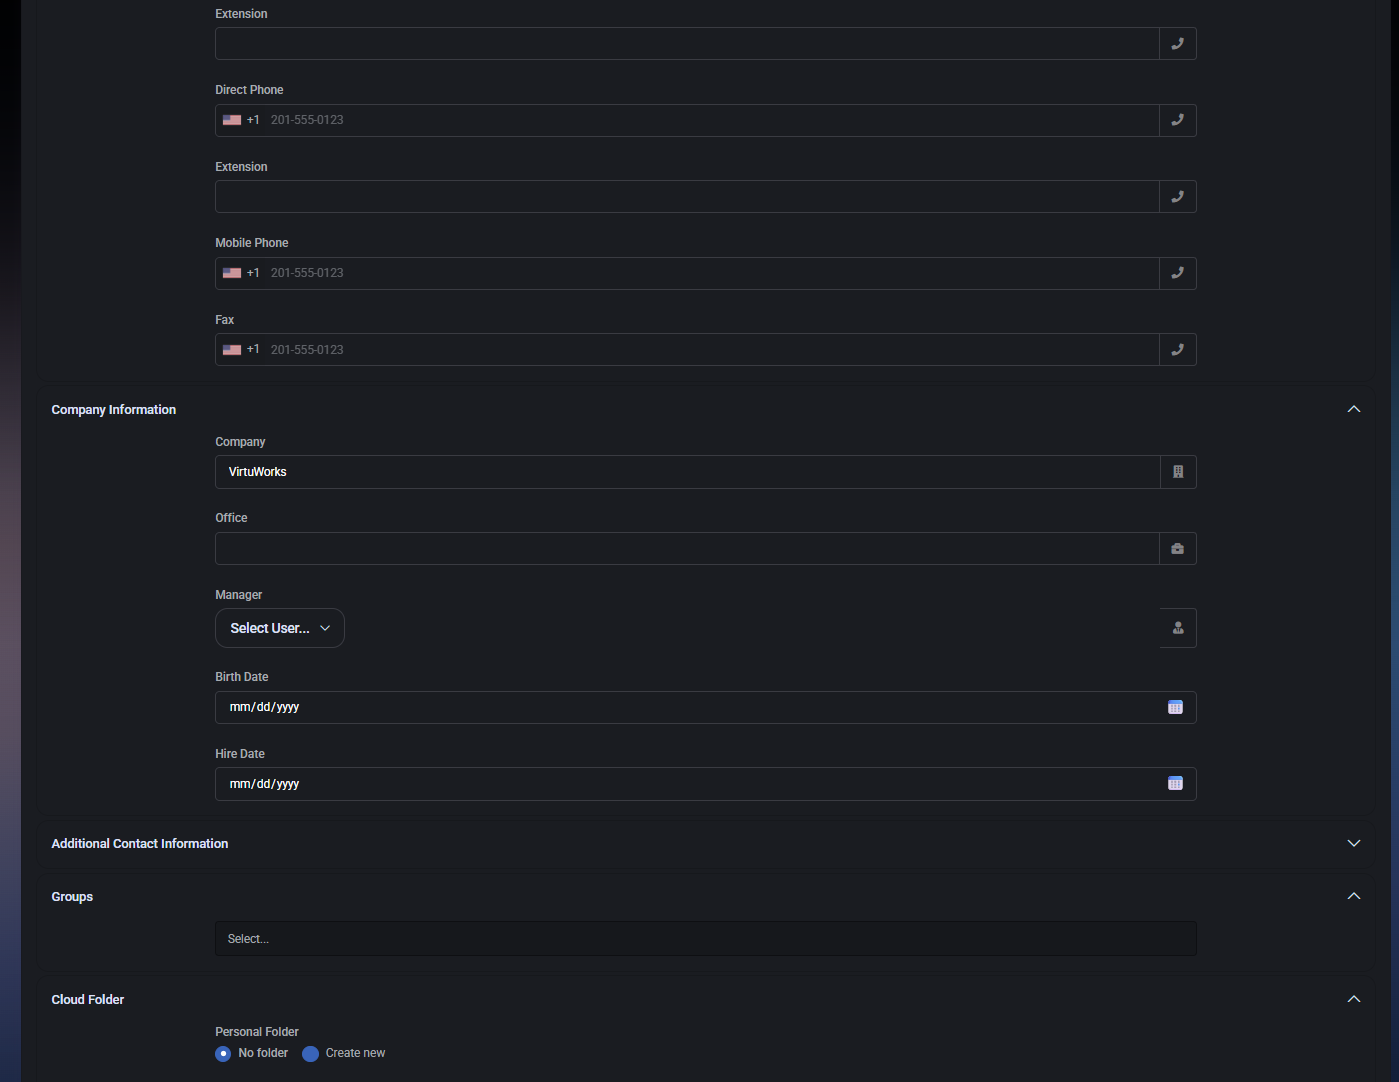
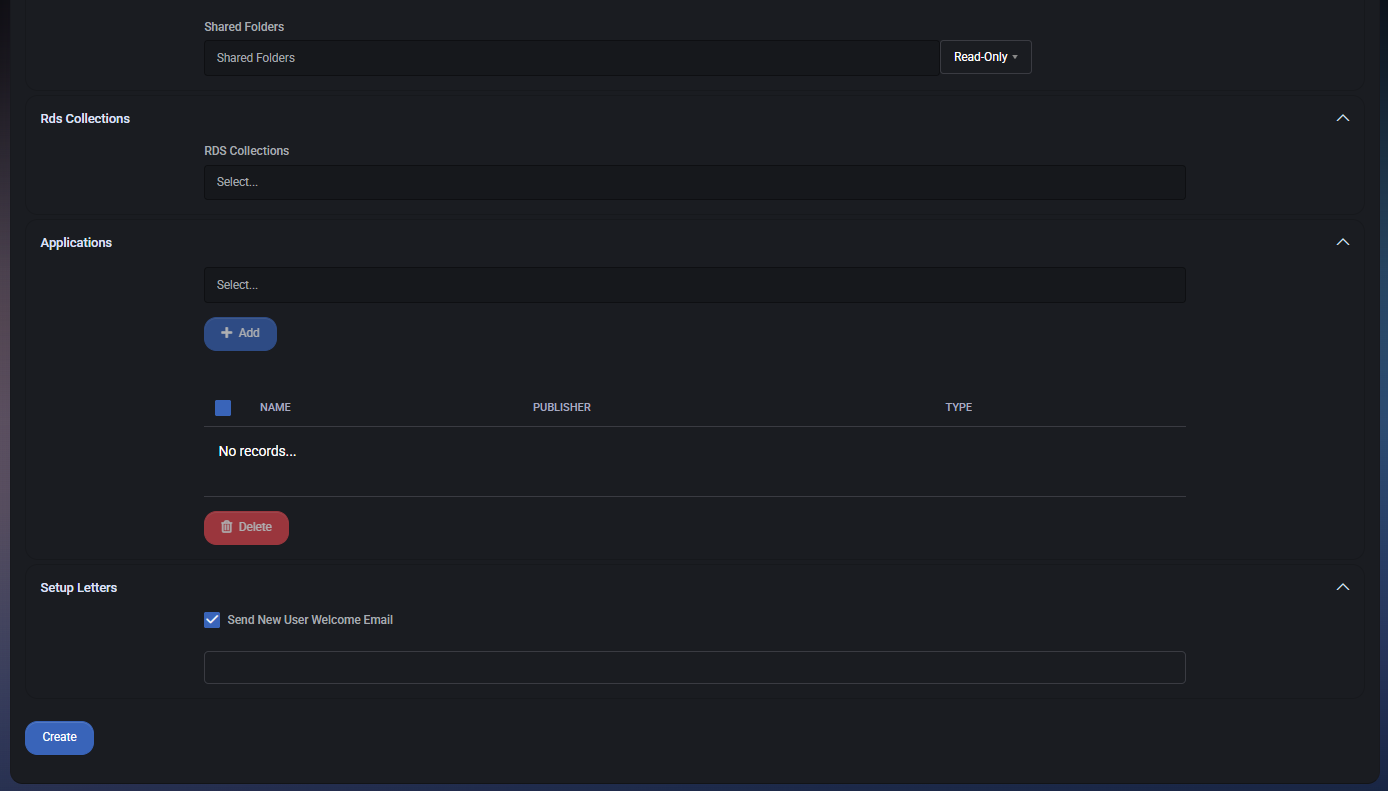
Create user sections
Section titled “Create user sections”Use this quick navigation list to jump to each section inside the Create User window.
- Organization metadata
- General
- Password and security
- Device Profile
- Address
- Company Information
- Additional Contact Information
- Groups
- Cloud Folder
- Rds Collections
- Applications
- Setup Letters
- Create
Organization metadata
Section titled “Organization metadata”This top block defines organizational attributes used for classification, filtering, and service-level/quota logic.
- Job Title – Defines the user’s job title. This field is split into two inputs:
- Select from list – Pick an existing job title value.
- Enter new value here – Add a new job title value if the required one does not exist yet.
- Department – Defines the user’s department. This field is also split into two inputs:
- Select from list – Pick an existing department value.
- Enter new value here – Add a new department value if needed.
- Organization Location – Assigns the user to an organization location (default shown as Default). This field is used with the All Locations filter on the Active Users page and may also drive location-based policy behavior.
- Service Level – Assigns a service-level classification to the user (shown as
<Select Service Level>until selected). This classification is referenced in Quotas Usage (service-level buckets) and can also be used by operational workflows.- The small button/icon to the right of the dropdown opens a helper/list view for selecting or reviewing service level entries (environment-dependent behavior).
- VIP – Marks the user as VIP. VIP is used for prioritization workflows (for example, escalations, special handling rules, or visibility in reporting depending on your configuration).
General
Section titled “General”The General section defines the user’s identity fields and email addresses.
- First Name – User’s first/given name.
- Middle Initial – Optional middle initial.
- Last Name – User’s last/family name.
- Display Name – The display name shown in MSPControl lists and UI (for example, the name shown in the Active Users table).
- Primary E-mail Address – Primary email address for the user. This field is split into:
- Local part (text input) – The part before
@. - Domain selector (dropdown) – The domain part after
@(for example, virtuworks.com).
- Local part (text input) – The part before
- Alternate E-mail Address – Optional alternate email address (commonly used for a secondary mailbox or an additional contact method).
- External E-mail Address – Optional external email address (commonly used for non-corporate contact, recovery, or guest/external scenarios depending on policy).
Password and security
Section titled “Password and security”This block defines how the user password is set and what password lifecycle controls apply.
- Send Password Request – When enabled, the system sends a password-related request/flow instead of (or in addition to) manually setting the password during creation (exact behavior depends on your configured identity workflow).
- Password – The initial password value for the account.
- The eye icon reveals/hides the password.
- Confirm Password – Must match the password value exactly.
- The eye icon reveals/hides the confirm value.
- Generate Password – Generates a strong password automatically. Use this to avoid weak manual passwords.
The following policy checkboxes control password lifecycle and operational handling:
-
Password Never Expires – Prevents password expiration for this user (use only when policy allows; commonly used for specific service accounts).
-
User must change password at next logon – Forces the user to set a new password on first sign-in.
-
Auto Renew Password – Enables automatic password renewal behavior for this account (environment-dependent implementation).
-
Save Password in Password Manager – Stores the password record in the system password manager feature (if enabled), allowing controlled access workflows.
-
Exclude from inactivity report – Excludes this user from inactivity-related reporting (useful for service accounts or special-purpose identities).
-
Exclude from Mailchimp syncing – Excludes this user from Mailchimp synchronization flows (if Mailchimp integration is used).
-
Two Factor Provider – Selects the two-factor provider for this user (shown as Email in the screenshot). This defines the 2FA delivery/validation method where supported.
-
New Azure AD user – When enabled, the user is treated as an Azure AD user creation/sync candidate (use in Azure AD integrated environments where the user should exist in Azure AD).
-
Schedule Activation – Enables scheduled activation behavior (used when accounts should be created now but activated later, depending on workflow configuration).
Device profile
Section titled “Device profile”The Device Profile section controls device-profile behavior for the user.
- Device Profile Override – Overrides the default device profile applied to this user (shown as None by default). Use this when a specific user requires a different device policy/profile than the organization standard.
- The small button/icon on the right side of the field opens a helper/selection view (environment-dependent) to assist in choosing or reviewing device profile options.
Address
Section titled “Address”The Address section stores the user’s location and phone contact details.
- Address – Multi-line address field (text area). The icon on the right provides a quick UI helper (environment-dependent).
- City – City field. The icon on the right provides a quick UI helper (environment-dependent).
- Country – Country dropdown (for example, “Select Country…”).
- State – State/region field.
- Zip – Postal code field.
- Phone Number 1 – Primary phone number field with country code selector (flag + code) and a quick action icon on the right.
- Extension – Optional phone extension for the phone number field(s).
- Direct Phone – Direct phone number field (commonly used for desk phone DID).
- Extension (Direct Phone) – Optional extension associated with the direct phone entry.
- Mobile Phone – Mobile number field.
- Fax – Fax number field (legacy contact method, where needed).
Company information
Section titled “Company information”The Company Information section defines internal organizational metadata used for reporting and organizational relationships.
- Company – Company name field (pre-filled in the screenshot as VirtuWorks).
- Office – Office field (used for office assignment metadata).
- Manager – Manager relationship selector. Choose another user as this user’s manager for organizational structure workflows (also referenced by the Set Manager bulk action on the Active Users list).
- Birth Date – Date picker field (format shown as mm/dd/yyyy).
- Hire Date – Date picker field (format shown as mm/dd/yyyy).
Additional contact information
Section titled “Additional contact information”Additional Contact Information is an expandable section for extended user contact/profile data. Expand it when you need to capture non-standard contact attributes beyond the default Address and Company Information blocks.
Groups
Section titled “Groups”The Groups section assigns the user to one or more groups.
- Select… – Group selection field. Add the user to the appropriate groups so they inherit correct permissions and access to resources.
Cloud folder
Section titled “Cloud folder”The Cloud Folder section configures personal/shared folder behavior for the user.
Personal folder
Section titled “Personal folder”- No folder – Do not create a personal folder for this user.
- Create new – Create a new personal folder for this user.
Shared folders
Section titled “Shared folders”- Shared Folders – Shared folder selection field.
- Permission level – Permission dropdown shown as Read-Only in the screenshot. Use this to control the user’s access level to the selected shared folders.
Rds collections
Section titled “Rds collections”The Rds Collections section assigns the user to one or more RDS collections (where RDS services are part of the Hosted Organization setup).
- Select… – Choose which RDS collections the user should be associated with.
Applications
Section titled “Applications”The Applications section is used to assign applications to the user (environment-dependent). This may represent published apps, assigned packages, or user-targeted application entitlements.
- Select… – Application selector field used to choose an application before adding it.
- Add – Adds the selected application to the user’s applications list.
The applications table shows assigned items:
-
Name – Application name.
-
Publisher – Application publisher/vendor.
-
Type – Application type/category.
-
Delete – Removes selected application assignments from the user (button below the table).
Setup letters
Section titled “Setup letters”The Setup Letters section controls onboarding communication for the new user.
- Send New User Welcome Email – When enabled, MSPControl sends a welcome/onboarding email to the new user after creation (based on your configured templates).
- Message / template input – A text field is available below the checkbox for custom content or template selection (behavior depends on your environment configuration).
Create
Section titled “Create”The Create button at the bottom of the window finalizes user creation using the provided values. Before clicking Create, verify:
- identity fields (name + display name) are correct,
- primary email is correct (local part + domain),
- password options match your policy,
- service level and location are set correctly (if used for quotas and workflows),
- group membership and folder/app assignments are correct.
