Identity and Microsoft Cloud
General tab
Section titled “General tab”The General tab is the primary place to manage core identity fields, password handling, security actions, service classification, and basic profile/contact details. The tab is organized into multiple subsections. The order below matches the UI order shown in the navigation panel.
General settings
Section titled “General settings”The General Settings block contains the core account identity fields and password controls.
-
Login Name – The user’s login identifier. It is split into:
- Local part – The text input (for example, jdoe).
- Domain selector – Dropdown after the
@icon (for example, Contoso.Com). This commonly represents the UPN domain used for sign-in.
-
Update Azure AD UPN – Checkbox that enables updating the Azure AD UPN value for this user (only relevant for Azure AD connected/synced environments).
-
Update – Action link/button used to apply the UPN update when the checkbox is selected. Use this carefully because changing UPN affects sign-in identity and may impact downstream integrations.
-
Display Name – The user-friendly name shown throughout MSPControl (for example, in the Active Users list).
-
Thumbnail Photo – User profile photo area.
-
Delete – Removes the current thumbnail photo (if one is set).
This block also includes password controls and security actions:
- Password – New password value. The eye icon reveals/hides the value.
- Confirm Password – Must match the password value. The eye icon reveals/hides the value.
- Generate Password – Generates a strong password.
- Set Password – Applies the password defined in the Password and Confirm Password fields.
- Send Password Reset Request – Triggers a password reset request workflow (delivery method and flow depend on your environment and identity provider).
- Force Reset Password – Forces a password reset requirement for the user (commonly used when credentials may be compromised or during security resets).
- Revoke Sessions – Revokes active sessions for the user, forcing re-authentication.
- Remove Mobile Devices – Removes all mobile device associations for the user.
- Remove From All Groups – Removes the user from every group at once.
If these actions are part of an active incident, follow the Microsoft 365 compromised-account response guide so evidence collection, containment, persistence review, and recovery remain coordinated.
For the supported ticket-based collection and policy controls, review BEC investigation and controlled containment. Verify the selected account, collection errors and effective Microsoft state; the availability of a user action does not mean an automated workflow has executed it successfully.
- Two-Factor Provider – Dropdown selecting the 2FA method for the user (example shown: SMS).
- Password Expiration date – Shows when the password will expire.
- Password Age – Shows how old the current password is (for example, 27 day(s)).
- Alternate E-mail Address – Optional alternate email field (visible below the password metadata area).
Scheduled actions
Section titled “Scheduled actions”The Scheduled Actions block is used to schedule account state changes, such as disabling the user at a future date.
- Scheduled Disable Date – Date picker for when the user should be disabled.
- Schedule Disable – Schedules the disable operation using the selected date.
Contact information
Section titled “Contact information”This section contains additional identity/contact fields and notes.
- First Name – User’s first/given name.
- Middle Initial – Optional middle initial.
- Last Name – User’s last/family name.
- External Email – External contact email address.
- Notes – Free-text notes field for internal context about the user.
- Home Phone – Optional home phone.
- Pager – Optional pager field.
- Web Page – Optional website field.
- Birth Date – Date picker field.
- Hire Date – Date picker field.
Service level information
Section titled “Service level information”This block controls the user’s service classification and VIP status. These values are used for quota categories and may also drive policy behavior in other modules.
- Service Level – Dropdown selecting a service level classification (example shown: Product Support Only).
- VIP – Checkbox to mark/unmark the user as VIP.
Company information
Section titled “Company information”This block stores organizational metadata about the user and is often used for reporting and structure.
- Job Title – Job title value.
- Company – Company name.
- Department – Department value.
- Office – Office value.
- Manager – Manager assignment.
Location
Section titled “Location”The Location block assigns the user to an organization location, which is used for filtering and potentially for location-based policies.
- Organization Location – Dropdown selecting the user’s assigned location (example: Virtuworks Main Office).
Address
Section titled “Address”This is a structured address and phone information block, commonly used for contact and operational context.
- Street Address 1 – Primary street address line.
- City – City.
- Select Country – Country selector (required as indicated by the asterisk in the UI).
- Region (State) – State/region selector.
- Postal Code – ZIP/postal code.
- Phone Number 1 – Primary phone number (with country code selector).
- Extension – Extension for Phone Number 1.
- Direct Phone – Direct phone number.
- Extension – Extension for Direct Phone.
- Mobile Phone – Mobile number.
- Fax – Fax number.
Org user-to-peer binding
Section titled “Org user-to-peer binding”This section links the organization user to a Peer identity (a platform-level user object used by MSPControl for cross-module identity handling).
- Please select a Peer – Dropdown to choose the peer object (example shows: Jane Doe (
<jdoe@example.com>)). - Initiate New Peer Creation – Starts a guided process to create a new peer record and bind it to this org user.
- Edit – Opens editing for the selected peer binding (where supported).
- Unbind – Removes the link between the org user and the peer record.
- Delete – Deletes the peer record itself.
Device profile
Section titled “Device profile”The Device Profile block allows overriding the default device profile policy for this user.
- Device Profile Override – Dropdown to select a specific device profile override (example: None).
Custom fields
Section titled “Custom fields”The Custom Fields section is available for environments that extend user profiles with organization-specific fields. Expand and complete these values if your Hosted Organization uses custom attributes for automation, reporting, or integration mapping.
Save actions
Section titled “Save actions”At the bottom of the user profile page, MSPControl provides the following save controls:
- Cancel – Discards changes made since the last save and returns you to the previous context.
- Save Changes And Exit – Saves updates and exits the user profile page.
- Save Changes – Saves updates and keeps you on the user profile page.
Microsoft 365 tab
Section titled “Microsoft 365 tab”Before expanding license assignments, use the Copilot readiness and AI-access review. It distinguishes the user-license interface from API/AI reports and the additional checks owned by Microsoft services.
The Microsoft 365 tab is used to manage the user’s Microsoft 365 / Entra ID linkage and to view or adjust license assignments. It contains two primary sections: General Settings (identity sync + license add) and Assigned Licenses (current licenses and their service plans).
General settings
Section titled “General settings”This section defines how the user is linked to Microsoft Entra ID (Azure AD) and provides a controlled way to add licenses.
- Sync User with Microsoft Entra ID – When enabled, MSPControl treats this user as linked/synced with Microsoft Entra ID. This is required when you want the user’s licenses and cloud identity state to be managed through the Microsoft 365 integration.
- Azure Object ID – The Entra ID Object ID for this user (GUID). This value uniquely identifies the user in Microsoft Entra ID.
- Copy (clipboard icon) – Copies the Object ID to the clipboard for troubleshooting, support cases, or portal navigation.
- Update – Applies the current Object ID / sync-related change. Use this after changing the Object ID value or when you need to re-apply the binding.
- Microsoft Azure Management Portal – A quick link label that indicates where the Azure Object ID is referenced and verified (Entra ID user object in the Azure portal).
- Licenses for Add – A dropdown used to select a license SKU to add to this user (shown as Select License until a value is chosen). Use this to assign an additional license on top of existing ones.
Assigned licenses
Section titled “Assigned licenses”This section shows all licenses currently assigned to the user. Licenses appear as separate blocks. Each block contains action buttons (for license-level operations) and a list of service plans/features that belong to that license.
License block actions
Section titled “License block actions”Each assigned license block can include some or all of the following buttons:
- Remove – Removes the entire license from the user. This typically revokes access to all services included in that license.
- Change – Opens a license change flow (for example, switching SKUs or adjusting which service plans are enabled/disabled under the license, depending on your integration rules).
- External License – Indicates the license is managed externally (for example, outside MSPControl licensing automation). This may affect what can be changed from MSPControl.
- Add-On – Adds an additional component/entitlement to the user (shown on some license types such as add-on style “Business Apps (free)” in the screenshot).
Service plans inside a license
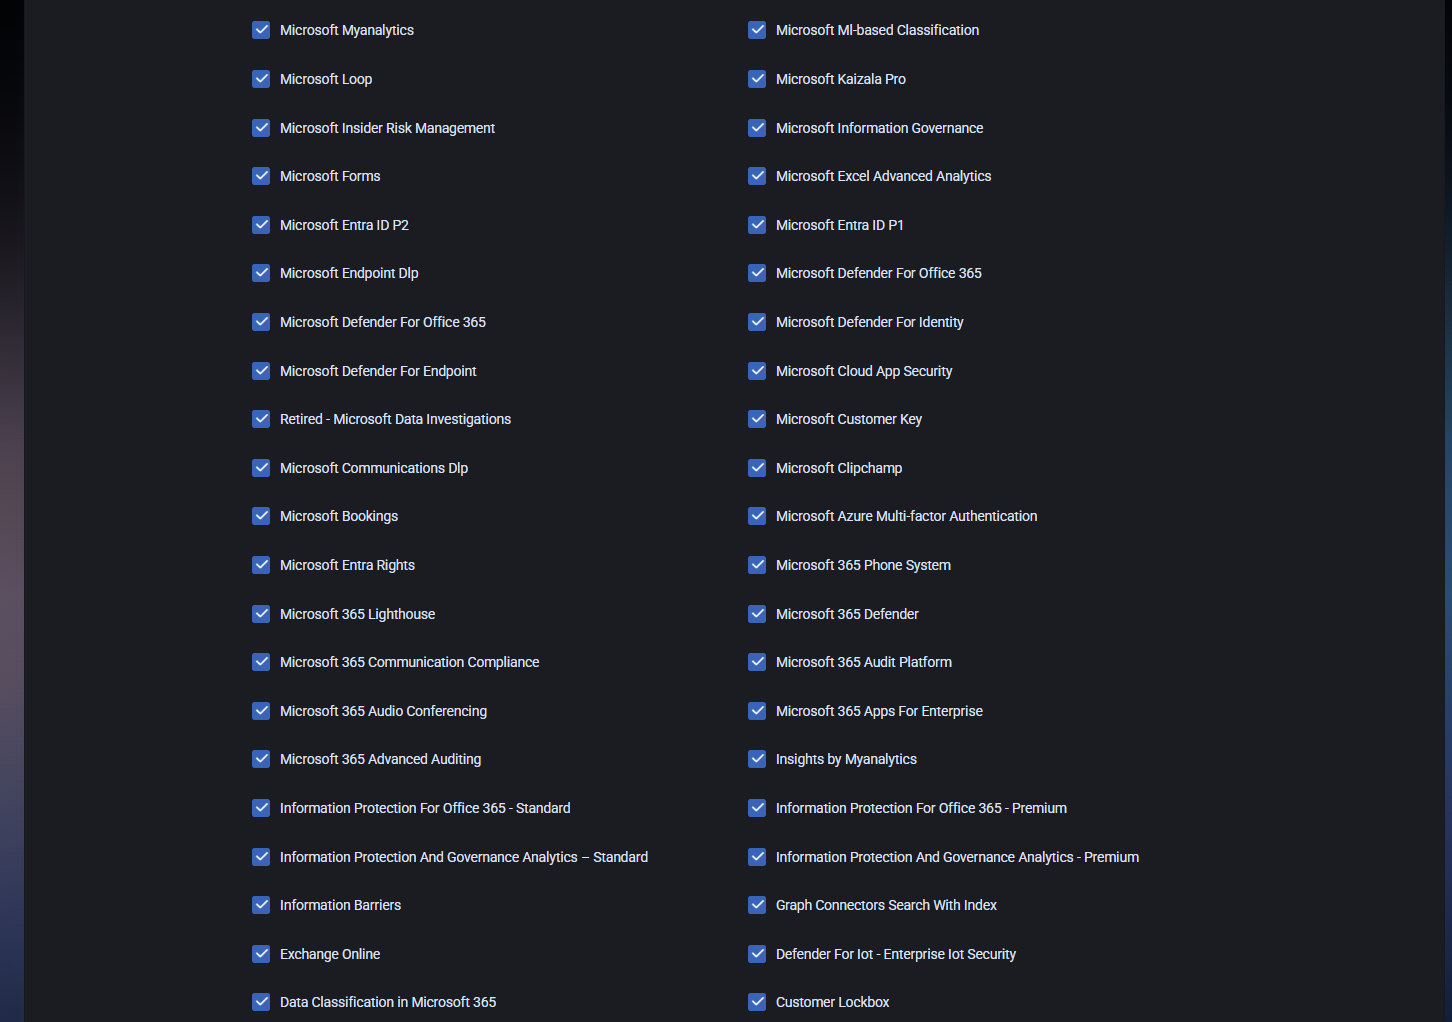
Section titled “Service plans inside a license”Under each license, MSPControl shows the related service plans/features. These appear as checkboxes to indicate whether a specific service plan is enabled for the user under that license.
- A checked plan means the service plan is enabled for this user under the license.
- An unchecked plan means the plan is disabled for this user (or not selected / not enabled in that license scope).
Some service plans can also display usage context inline, for example:
- OneDrive / SharePoint usage indicator – A small bar and text line showing consumed storage and remaining capacity (example shown: “OneDrive usage … of … MB, available … MB”). This is informational and helps validate consumption for the licensed service.
Expandable examples of license contents
Section titled “Expandable examples of license contents”You do not need to review every individual service plan entry in the UI during routine work. Use the expandable summaries below as a reference for what the license blocks typically contain. Example: MICROSOFT_365_COPILOT (service plan checklist)
- Microsoft Viva Insights Backend
- Copilot Studio in Copilot for M365
- Graph Connectors in Microsoft 365 Copilot
- Microsoft 365 Copilot in Productivity Apps
- Microsoft Copilot with Graph-grounded Chat
- Microsoft Viva Insights
- Microsoft 365 Copilot for SharePoint
- Power Platform Connectors in Microsoft 365 Copilot
- Microsoft 365 Copilot in Microsoft Teams
- Intelligent Search
Example: MICROSOFT 365 E5 (NO TEAMS) (EXTERNAL) (service plan checklist)
- INSIGHTS_BY_MYANALYTICS
- MICROSOFT_MYANALYTICS_FULL
- Windows Autopatch / Windows Update for Business Deployment Service
- Defender / Cloud App Security related plans
- Exchange Online / Information Protection / Compliance related plans
- SharePoint and OneDrive-related plans (may show usage inline)
- Microsoft Search / Planner / To-do and other collaboration services
Example: BUSINESS APPS (FREE) (EXTERNAL) (service plan checklist)
- Microsoft Invoicing
- Microsoft Bookings
Example: MICROSOFT TEAMS ENTERPRISE / PREMIUM (EXTERNAL) (service plan checklist)
- Microsoft Teams
- Immersive Spaces for Teams
- OneDrive for Business (may show usage inline)
- Microsoft Teams Premium features (queues, webinars, secure, intelligent, virtual appointments, etc.)
At the bottom of the Microsoft 365 tab, the Exit button closes the current user view and returns you to the previous context. Use this after reviewing assigned licenses or making changes through the available license actions.
Entra ID roles tab
Section titled “Entra ID roles tab”The Entra ID roles tab separates the selected user’s Eligible and Active Microsoft Entra role assignments. From these views, an authorized operator can add, activate, update, extend, or remove assignments according to the assignment type and current schedule.
Use Manage Microsoft Entra PIM role assignments for the current fields, supported actions, verification steps, and troubleshooting guidance.
OneDrive tab
Section titled “OneDrive tab”The OneDrive tab is used to manage ownership access for the user’s OneDrive. This is typically used during offboarding, account recovery, or administrative continuity scenarios, where additional owners must be granted access to the user’s OneDrive content.
OneDrive owners
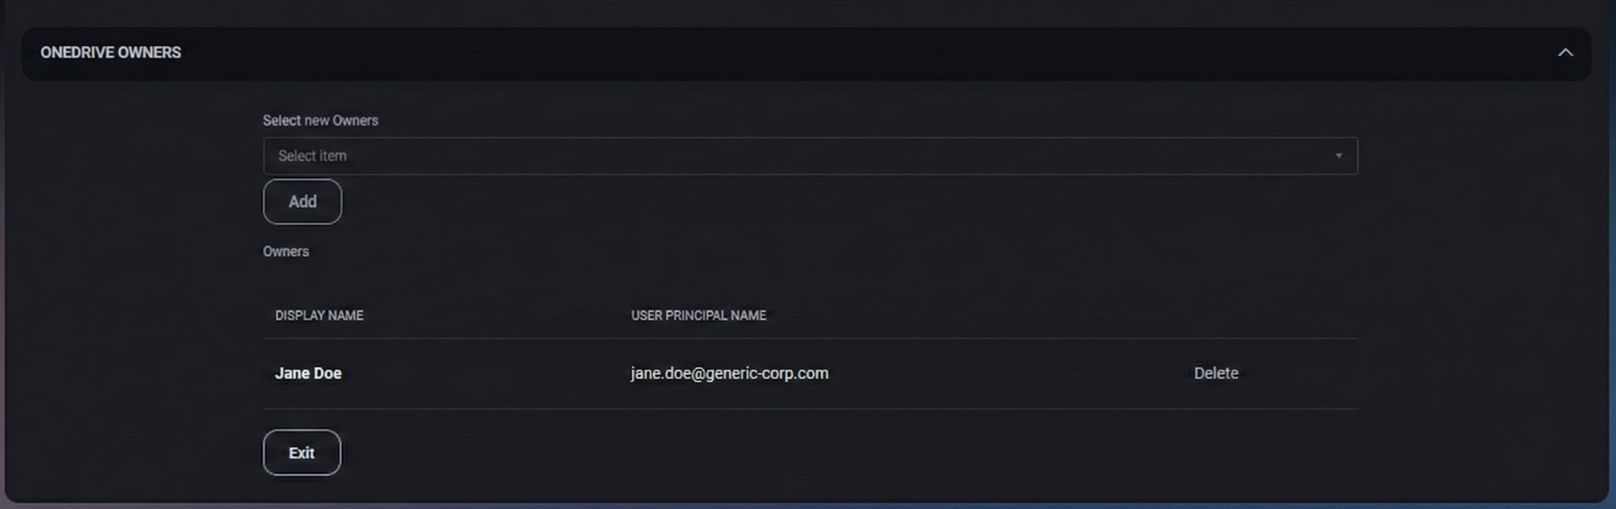
Section titled “OneDrive owners”The OneDrive Owners section allows you to add or remove owners for the user’s OneDrive.
- Select new Owners – Dropdown selector used to choose a user to be added as an additional OneDrive owner (shown as Select item until chosen).
- Add – Adds the selected user as a OneDrive owner.
After adding an owner, they appear in the Owners list below.
Owners list
Section titled “Owners list”The Owners list shows current OneDrive owners for the user.
- Display Name – The owner’s display name.
- User Principal Name – The owner’s login identity (UPN / email).
- Delete – Removes the selected owner from the OneDrive owners list.
The Exit button closes the OneDrive tab view and returns you to the previous context.
