Documentation and History
Notes tab
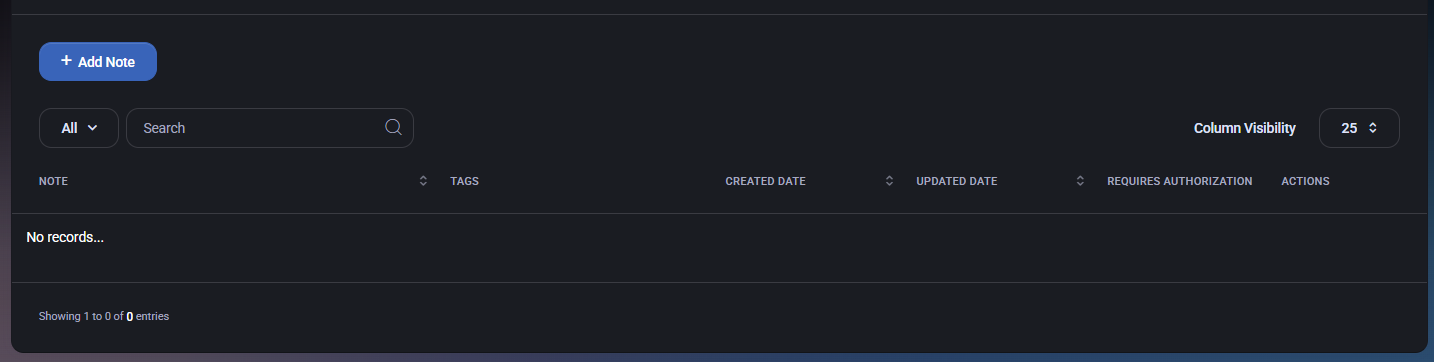
Section titled “Notes tab”The Notes tab is used to store free-form notes linked to the user. Notes are typically used for operational context (onboarding details, exception justifications, security remarks) and can be scoped with tags and optional authorization requirements.
Primary actions
Section titled “Primary actions”- Add Note – Opens the Create Note dialog to create a new user note.
Filters and controls
Section titled “Filters and controls”- All – View selector used for filtering the notes list (depends on your UI configuration).
- Search – Filters notes by content and/or visible fields depending on indexing rules.
- Column Visibility – Controls which columns are displayed in the notes table.
- Page size – Controls how many notes are shown per page (example shown: 25).
Notes list
Section titled “Notes list”The table displays notes created for the user. If no notes exist, the page shows an empty state (for example, No records…).
Columns
Section titled “Columns”- Note – The note content or preview text.
- Tags – Tag context associated with the note.
- Created Date – Date/time when the note was created.
- Updated Date – Date/time when the note was last modified.
- Requires Authorization – Indicates whether authorization is required to access the note.
- Actions – Row actions (for example, edit/delete depending on configuration).
Create note dialog
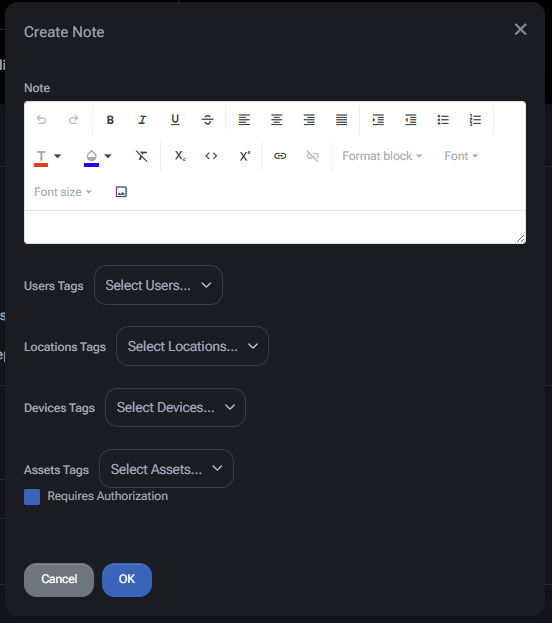
Section titled “Create note dialog”Clicking Add Note opens the Create Note dialog. Use this dialog to write the note content, apply tags, and optionally require authorization before the note can be accessed.
Note editor
Section titled “Note editor”The Note field uses a rich-text editor. It supports basic formatting and structured content (for example, bold/italic/underline, alignment, lists, links, and format blocks).
Tags scope the note to the relevant context and make it easier to filter and control access.
- Users Tags – Associates the note with specific users.
- Locations Tags – Associates the note with one or more locations.
- Devices Tags – Associates the note with one or more devices.
- Assets Tags – Associates the note with one or more assets.
Authorization
Section titled “Authorization”- Requires Authorization – When enabled, additional authorization is required to access/view the note (exact workflow depends on your security configuration).
Dialog actions
Section titled “Dialog actions”- OK – Saves the note and links it to the user.
- Cancel – Closes the dialog without saving.
- Close (X) – Closes the dialog window.
Photos tab
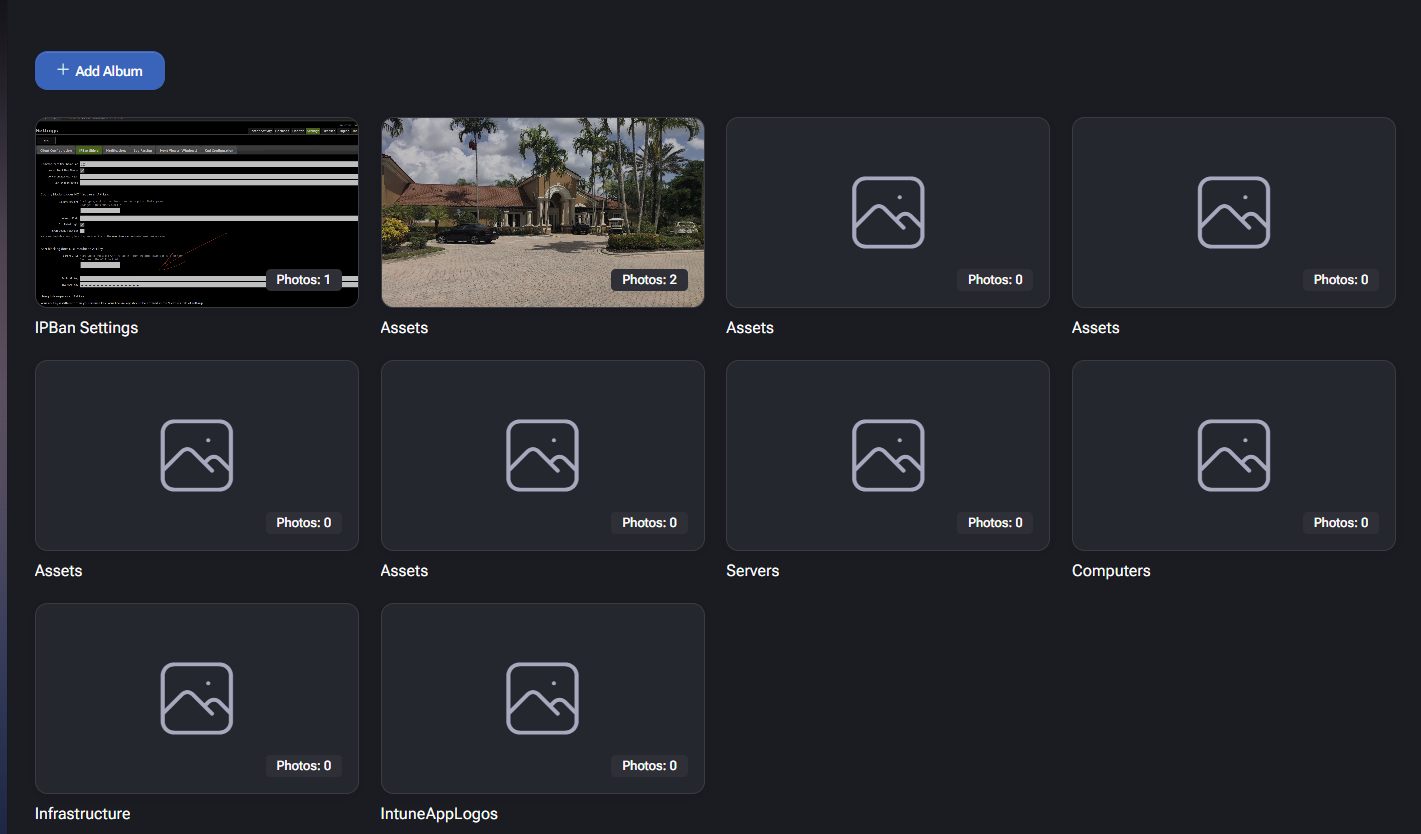
Section titled “Photos tab”The Photos tab is used to store and organize user-related images in albums. Albums help keep photos grouped by purpose (for example, ID photos, onboarding screenshots, device photos, or other user-related evidence). Each album tile shows a cover preview and a Photos: X counter indicating how many images are stored in that album.
Add album
Section titled “Add album”Click Add Album to create a new album for the user. Albums act as containers for photos and can also be protected with authorization if required by your security policy.
- Add Album – Opens the album creation flow (album details are confirmed via a dialog).
Album grid
Section titled “Album grid”The main area displays albums as tiles. Each tile includes:
- Album cover preview – A thumbnail preview (or placeholder if the album has no images).
- Album name – The label shown under the tile (for example, Assets, Infrastructure).
- Photos counter – A badge showing how many photos are inside the album (for example, Photos: 2).
Edit album dialog
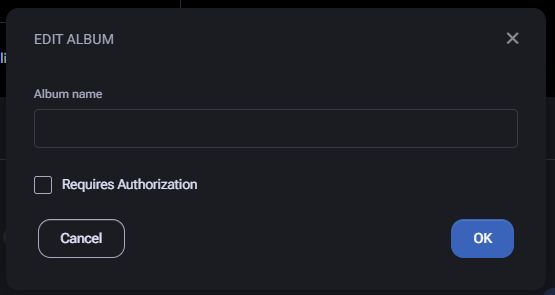
Section titled “Edit album dialog”When editing an album, MSPControl shows an Edit Album dialog. This dialog is used to set the album name and (optionally) enforce authorization requirements.
- Album name – Sets or updates the album title displayed in the album grid.
- Requires Authorization – When enabled, access to the album and its photos requires authorization (workflow depends on your security configuration).
Dialog actions
Section titled “Dialog actions”- OK – Saves the album changes.
- Cancel – Closes the dialog without saving.
- Close (X) – Closes the dialog window.
Passwords tab
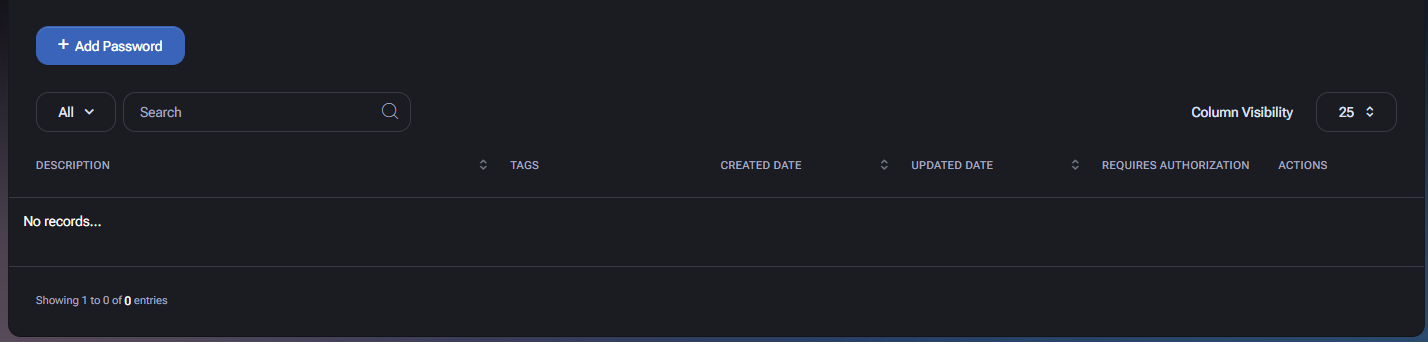
Section titled “Passwords tab”The Passwords tab is used to store and manage credentials linked to the user. This may include local device passwords, application credentials, service logins, or MFA secrets. Entries can be scoped using tags and optionally protected by an authorization workflow.
Primary actions
Section titled “Primary actions”- Add Password – Opens the Create Password dialog to create a new password entry for this user.
Filters and controls
Section titled “Filters and controls”- All – View selector used for filtering the list (depends on your UI configuration).
- Search – Filters password entries by description and/or visible fields.
- Column Visibility – Controls which columns are displayed in the passwords table.
- Page size – Controls how many entries are shown per page (example shown: 25).
Passwords list
Section titled “Passwords list”The table lists all password entries stored for the user.
Columns
Section titled “Columns”- Description – A human-readable label describing what the password is for (for example, a device name + account type).
- Tags – Tags applied to the password entry (example shown as a user tag badge).
- Created Date – Date/time when the password entry was created.
- Updated Date – Date/time when the password entry was last modified.
- Requires Authorization – Indicates whether authorization is required to view/access this password entry.
- Actions – Row-level actions for managing the entry (for example, edit, disable/revoke, delete depending on configuration).
Create password dialog
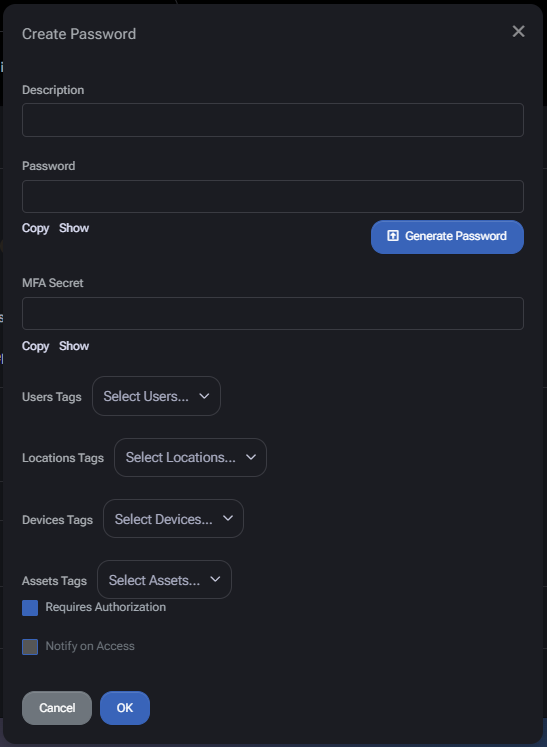
Section titled “Create password dialog”Clicking Add Password opens the Create Password dialog. This dialog is used to define the secret value(s), apply tags, and configure access controls.
Fields
Section titled “Fields”- Description – Short label describing the credential (use a clear naming convention, such as
<Device> - <Account>). - Password – The secret value. The dialog provides:
- Copy – Copies the password value.
- Show – Reveals/hides the password value.
- Generate Password – Generates a strong password automatically.
- MFA Secret – Optional field for storing an MFA/TOTP secret associated with this credential. Provides:
- Copy – Copies the MFA secret value.
- Show – Reveals/hides the MFA secret value.
Tags scope the password entry to relevant context and can be used to filter and enforce access rules.
- Users Tags – Associates the password entry with selected users.
- Locations Tags – Associates it with one or more locations.
- Devices Tags – Associates it with one or more devices.
- Assets Tags – Associates it with one or more assets.
Access controls
Section titled “Access controls”- Requires Authorization – When enabled, users must go through an authorization workflow before the credential can be revealed.
- Notify on Access – When enabled, the system generates a notification/audit signal whenever the credential is accessed, improving accountability for privileged secrets.
Dialog actions
Section titled “Dialog actions”- OK – Saves the password entry.
- Cancel – Closes the dialog without saving.
- Close (X) – Closes the dialog window.
Documents tab
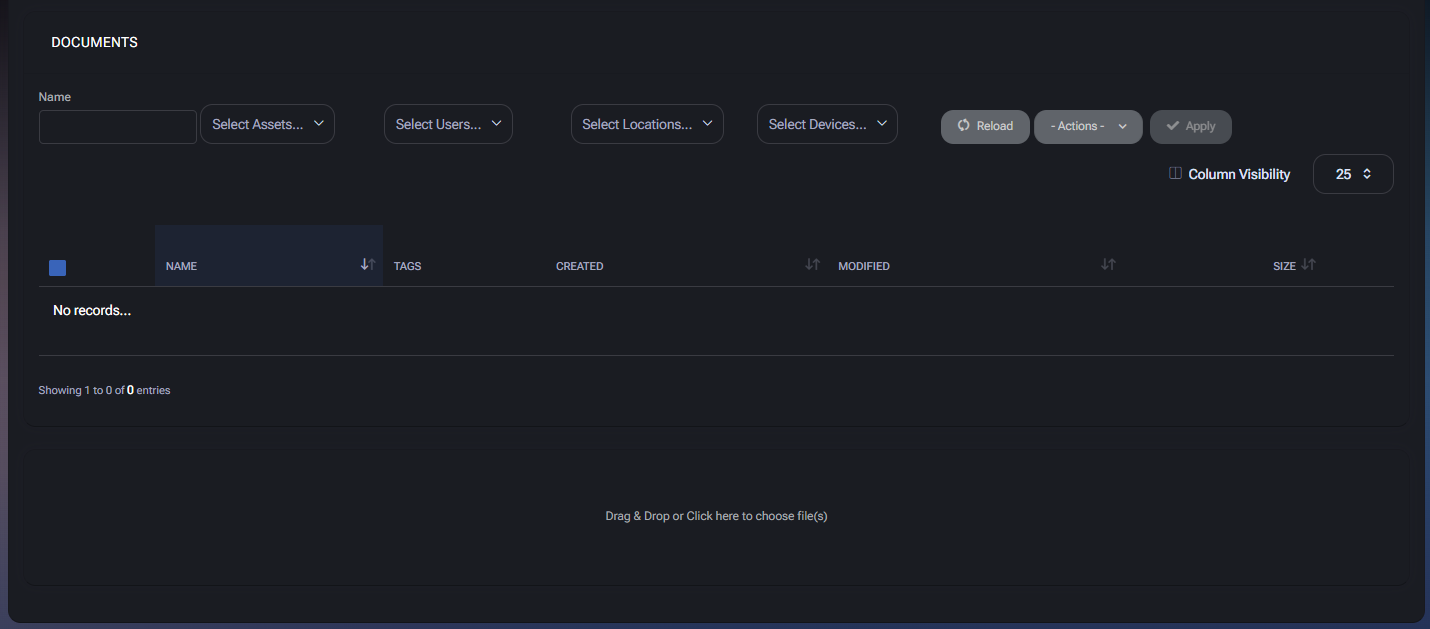
Section titled “Documents tab”The Documents tab is used to store and manage files linked to the user. Documents can be tagged for filtering and can be associated with assets, users, locations, and devices to keep operational documentation searchable and properly scoped.
Filtering and list controls
Section titled “Filtering and list controls”The top filter area is used to narrow down the document list.
- Name – Text filter to search documents by file name.
- Select Assets… – Filters documents by associated asset tags/links.
- Select Users… – Filters documents by user tags/links.
- Select Locations… – Filters documents by location tags/links.
- Select Devices… – Filters documents by device tags/links.
- Reload – Refreshes the document list using the current filter values.
- Actions – Dropdown for bulk operations on selected documents (used together with Apply).
- Apply – Executes the selected bulk action on all checked document rows. (This button may remain disabled until at least one row is selected and an action is chosen.)
Documents list
Section titled “Documents list”The documents table shows all files currently linked to the user. If no documents exist, the table shows an empty state (for example, No records…).
Columns
Section titled “Columns”-
Select checkbox – Select one or more documents for bulk actions.
-
Name – Document file name.
-
Tags – Tags associated with the document (assets/users/locations/devices).
-
Created – Date/time when the document was uploaded/created.
-
Modified – Date/time when the document was last modified.
-
Size – File size.
-
Column Visibility – Allows showing/hiding table columns to match your workflow.
-
Page size – Controls the number of rows displayed per page (example shown: 25).
Uploading documents
Section titled “Uploading documents”The lower section of the page contains a document upload panel.
- Drag & Drop – Drop one or more files into the upload area to attach them to the user.
- Click to choose file(s) – Click the upload area to open the file picker and select files manually.
Uploaded files become visible in the documents table above and can then be tagged and managed using the available filters and actions.
Bot tab
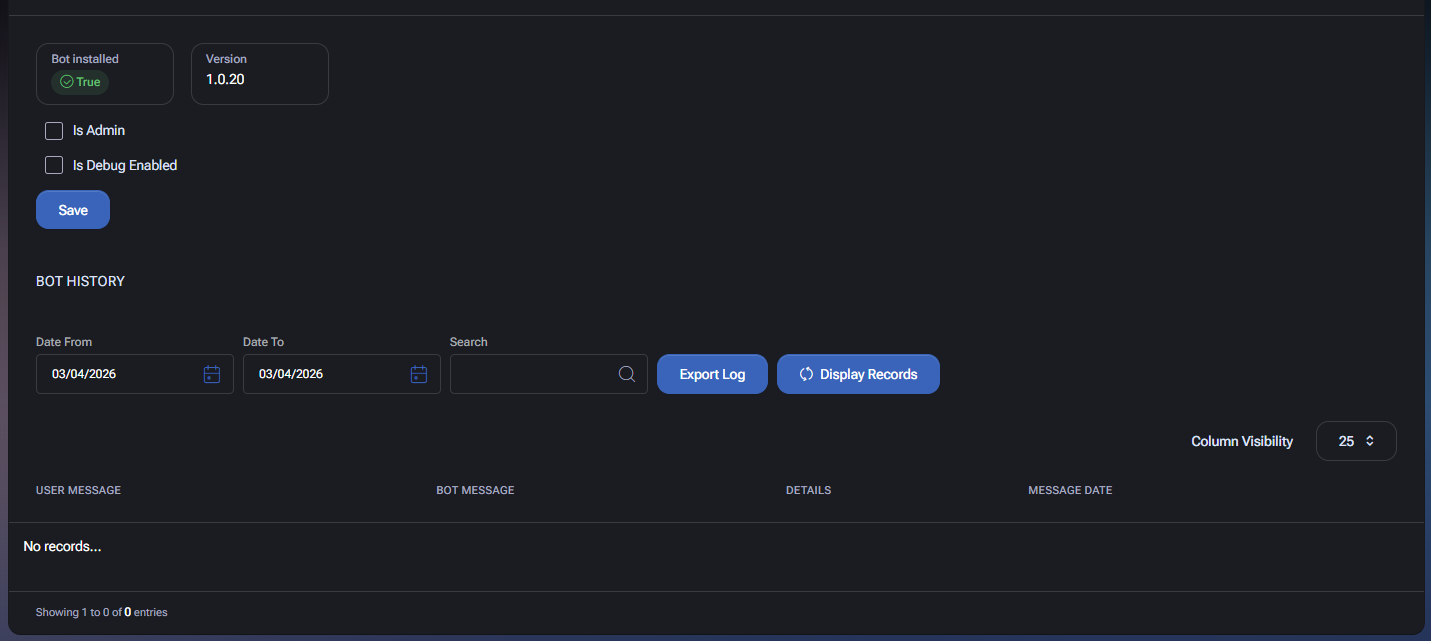
Section titled “Bot tab”The Bot tab shows the status and activity history for the MSPControl bot integration used by the user (VirtuBot). It is primarily used to verify whether the bot is installed for the user, control a small set of bot-related flags, and review bot message history within a selected time range.
Bot status and flags
Section titled “Bot status and flags”The upper block provides installation and version visibility, plus user-level flags that affect bot behavior.
-
Bot installed – Indicates whether the bot is installed for this user. The UI displays a status badge (example shown: True).
-
Version – Shows the installed bot version for this user (example shown: 1.0.20).
-
Is Admin – Marks the user as a bot admin (enables elevated bot capabilities for this user where supported).
-
Is Debug Enabled – Enables additional debugging behavior for this user’s bot interaction (useful when investigating bot issues or validating workflows).
-
Save – Saves changes to the bot flags.
Bot history
Section titled “Bot history”The Bot History section is used to review bot-related messages and events for this user. If no history exists for the chosen date range, the table shows an empty state (for example, No records…).
Filters
Section titled “Filters”-
Date From – Start date for the history query. Includes a calendar picker icon.
-
Date To – End date for the history query. Includes a calendar picker icon.
-
Search – Text search field to filter results by message content or other visible fields (depending on indexing rules).
-
Export Log – Exports the currently filtered bot history as a log file for offline review or support/troubleshooting.
-
Display Records – Runs the query using the current filters and displays matching history records in the table below.
History table
Section titled “History table”The table lists bot interactions for the user.
-
User Message – The message content sent by the user to the bot.
-
Bot Message – The bot response content.
-
Details – Additional event context (for example, action type, processing notes, or system metadata depending on configuration).
-
Message Date – Timestamp when the message/event was recorded.
-
Column Visibility – Shows/hides columns in the bot history table.
-
Page size – Controls the number of rows displayed per page (example shown: 25).
Audit log tab
Section titled “Audit log tab”The Audit Log tab provides a chronological record of actions performed on the user account. It is used for traceability, troubleshooting, accountability, and compliance review. Each row shows who performed the action, what happened, and when it happened.
Audit log table
Section titled “Audit log table”The table lists recorded actions related to the user profile and account lifecycle.
-
User – The actor who performed the action. The value is displayed in a combined format that may include:
- login/username
- display name / full name
- organization name
For example, entries may appear like jdoe / Jane Doe / Contoso or serveradmin / Enterprise Administrator / Contoso.
-
Scheduler – Indicates whether the action was performed by a scheduled/automated process. In the screenshot, values are shown as No, meaning the action was not triggered by the scheduler.
-
Message – Description of the action that occurred (for example, Password changed or User general settings updated).
-
Action Date – The exact date and time when the action was recorded.
Column and page controls
Section titled “Column and page controls”- Column Visibility – Allows showing or hiding columns in the audit log table to match your review needs.
- Page size – Controls the number of rows displayed per page (example shown: 25).
How to use the audit log
Section titled “How to use the audit log”- Use Message to quickly identify the type of change that occurred.
- Use User to determine whether the action was performed by the account owner, another administrator, or a privileged/system-level actor.
- Use Scheduler to distinguish manual actions from scheduled automation.
- Use Action Date to reconstruct the timeline of changes during troubleshooting or security review.
