Services and Membership
Cloud folders tab
Section titled “Cloud folders tab”The Cloud Folders tab is used to manage user folder provisioning and bindings. It typically controls whether a user has a personal folder, how it is created or linked, and how quota enforcement is applied. This tab is commonly used during onboarding (create a personal folder), migrations (bind to an existing folder), or operational updates (adjust quotas and drive letters).
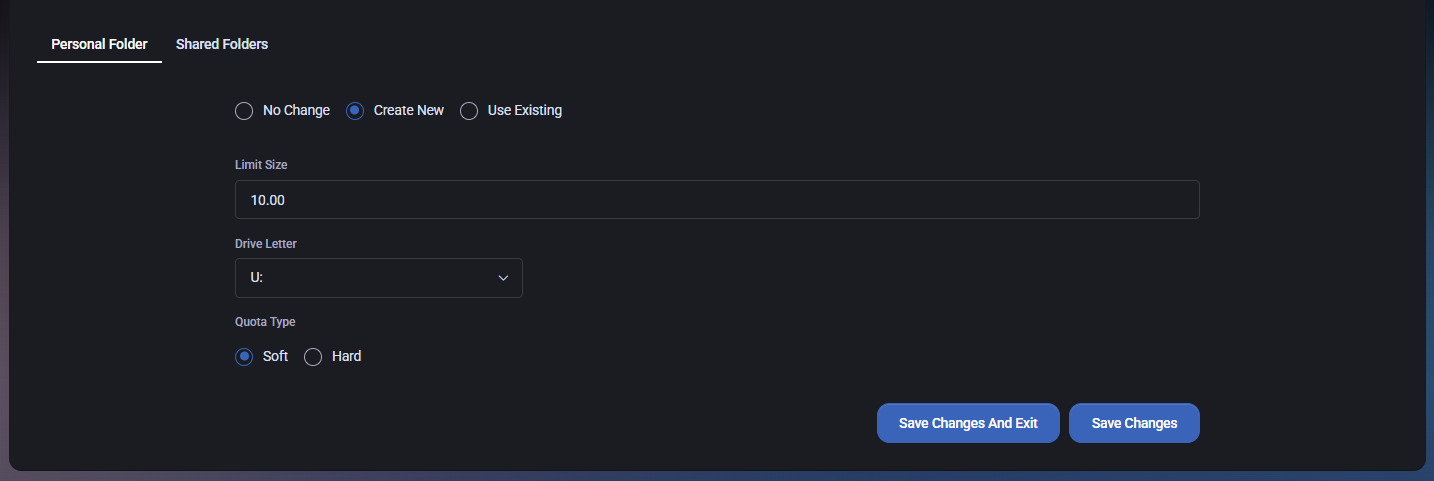
Sub-tabs
Section titled “Sub-tabs”The Cloud Folders tab contains two sub-tabs:
- Personal Folder – Create, bind, or keep the user’s personal folder unchanged.
- Shared Folders – Manage access to shared folders (covered later when we continue this tab).
Personal folder
Section titled “Personal folder”The Personal Folder sub-tab provides three mutually exclusive options that define what MSPControl should do with the user’s personal folder.
- No Change – Leaves the current personal folder configuration unchanged. Use this when you are reviewing settings or making changes unrelated to folder provisioning.
- Create New – Creates a new personal folder for the user. Selecting this option reveals additional configuration fields.
- Use Existing – Binds the user to an existing folder. Selecting this option reveals a binding selector.
Create new (personal folder)
Section titled “Create new (personal folder)”When you select Create New, MSPControl displays configuration fields that define the new folder’s quota settings and how it will be presented to the user.
- Limit Size – Maximum size allowed for the personal folder (example shown: 10.00). The unit depends on your hosting configuration (commonly GB).
- Drive Letter – Select the drive letter used to map the personal folder for the user (example shown: U:). This is commonly used in RDS/VDI environments where folders are mapped as drives.
- Quota Type – Defines how quota enforcement works:
- Soft – Allows exceeding the quota while tracking/flagging overage (behavior depends on platform implementation).
- Hard – Prevents exceeding the quota by enforcing a strict limit.
Use existing (bind to existing folder)
Section titled “Use existing (bind to existing folder)”When you select Use Existing, MSPControl allows you to bind this user to a folder that already exists in the environment. This is typically used during migrations, rebuilds, or when recreating users while retaining previous storage.
- Bind to Existing Folder – Dropdown selector used to choose the existing folder that should be linked to this user.
Save actions
Section titled “Save actions”The Cloud Folders tab provides two save actions in the bottom-right corner of the page.
- Save Changes – Saves the current configuration and keeps you on the Cloud Folders tab.
- Save Changes And Exit – Saves the configuration and exits the current view (returns to the previous context).
RDS collections tab
Section titled “RDS collections tab”The RDS Collections tab is used to assign the user to one or more Remote Desktop Services (RDS) collections. This controls which RDS environments or published desktop/application collections the user can access (depending on how your Hosted Organization is configured).
Add user to an RDS collection
Section titled “Add user to an RDS collection”Use this flow to add the user to an additional collection.
- Collection selector – Dropdown at the top of the page (shown as Select) used to choose the RDS collection you want to assign to the user.
- Add – Adds the selected collection to the user’s assigned collections list.
Assigned collections list
Section titled “Assigned collections list”The table shows which RDS collections are currently assigned to the user.
-
Select checkbox – Select one or more rows for bulk removal.
-
Collection Name – The name of the assigned RDS collection (example shown: Virtuworks-RDSTECH).
-
Delete (trash icon) – Removes the user from the selected collection (row-level delete).
-
Delete Selected – Bulk removal action that deletes the assignments for all selected rows.
Save actions
Section titled “Save actions”After modifying the user’s RDS collection assignments, use one of the save buttons in the bottom-right corner:
- Save Changes – Saves updates and keeps you on the RDS Collections tab.
- Save Changes And Exit – Saves updates and exits the current user view (returns to the previous context).
Setup tab
Section titled “Setup tab”The Setup tab is used to send onboarding/setup instructions to the user via email. It provides a simple “send” interface with recipient fields and an email preview, so you can confirm the content before delivery.
Send via e-mail
Section titled “Send via e-mail”The main section on this tab is Send via E-mail. Use it when you need to deliver setup instructions or onboarding information to the user (for example, first login steps, password setup, or general getting-started guidance).
- To – Primary recipient email address. This is where the setup message will be sent.
- CC – Optional carbon-copy recipients. Use this to include additional recipients (for example, a manager or onboarding coordinator) when appropriate.
- Send – Sends the email using the currently shown content in the preview.
E-mail preview
Section titled “E-mail preview”The E-Mail Preview pane shows the email content exactly as it will be sent. Review the preview before sending to confirm:
- the recipient address is correct,
- the message content is appropriate for the user,
- any embedded links (for example, password reset links) are present and visible.
The preview area is scrollable, allowing you to inspect the full message body before sending.
Member of tab
Section titled “Member of tab”The Member Of tab is used to manage the user’s group memberships. It provides a simple way to add the user to a group and remove the user from one or more groups. This is commonly used for access control, mailbox/distribution behavior, and policy targeting.
Add group membership
Section titled “Add group membership”Use the controls at the top of the page to add the user to a new group.
- Select – Dropdown used to pick a group to add the user to (shown as Select until chosen).
- Add – Adds the selected group membership to the user.
Group memberships list
Section titled “Group memberships list”The table lists all groups the user is currently a member of.
- Select checkbox – Select one or more group rows for bulk removal.
- Display Name – The group’s display name (friendly name shown to admins).
- E-mail Address – The group email address (where applicable, typically for distribution lists and mail-enabled groups).
- Type – The group type (examples in the UI include OnlineDistributionList and SecurityGroup).
- Delete (trash icon) – Removes the user from that specific group membership (row-level remove).
Delete
Section titled “Delete”The Delete action at the top-right of the table is used for removing membership from selected groups.
- Delete – Removes the user from all groups selected via the checkbox column.
Important: Removing group membership may immediately remove access to resources or stop the user from receiving group emails, depending on how the group is used in your environment.
Archives tab
Section titled “Archives tab”The Archives tab is used to generate and manage exported mailbox archive files for the user. It provides a workflow to archive the user’s online mailbox to a PST file and then view the resulting archive records in a table.
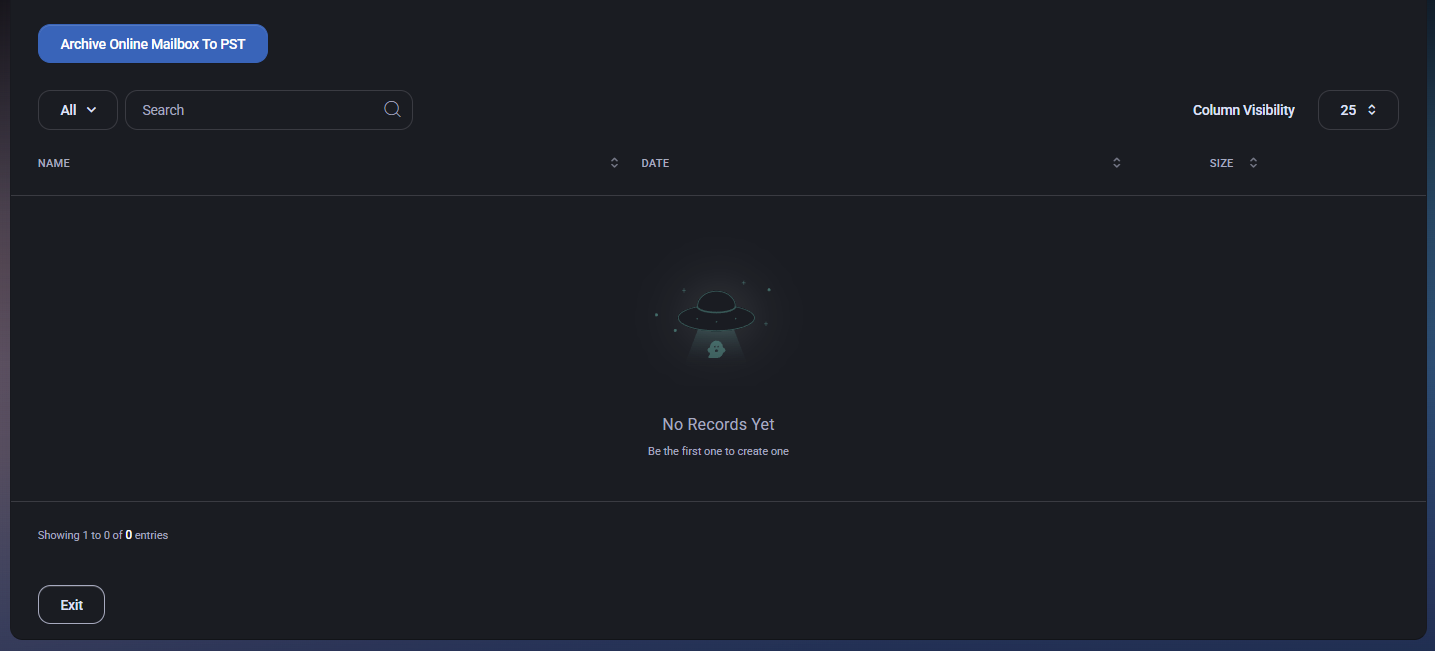
Archive online mailbox to PST
Section titled “Archive online mailbox to PST”The main action on this page is Archive Online Mailbox To PST. Use it when you need a portable mailbox export for retention, legal hold workflows, investigation support, or offboarding.
- Archive Online Mailbox To PST – Starts the archive/export process for the user’s online mailbox.
Filters and controls
Section titled “Filters and controls”- All – View selector used for filtering the archive list (depends on your UI configuration).
- Search – Filters archive records by name or other visible fields.
- Column Visibility – Controls which columns are displayed in the archives list.
- Page size – Controls the number of records shown per page (example shown: 25).
Archives list
Section titled “Archives list”The archives table shows PST exports created for this user. If no exports exist yet, the page displays an empty state (for example, No Records Yet).
Columns
Section titled “Columns”- Name – Archive file name or record name.
- Date – When the archive was created.
- Size – Archive file size.
The Exit button closes the Archives tab view and returns you to the previous context.
